Showing posts with label Decorating. Show all posts

Wednesday, September 16, 2015

My Fall Mantle

Our family room still needs 1000 upgrades, but for now the fireplace is finished and I want to show it off! After painting the fireplace I had to decorate it for FALL. It's finally cooling off and we get really excited when that happens in Georgia. I still need some pumpkins and to decorate the rest of the house, but for now the mantle is decorated for fall.


I just used items that I already had around the house. The only purchase I made was from Target. I bought the gold leaf stickers and chalkboard banner for $1/each. I can't describe how excited I was when I saw those items in the bins, lol.


I made the burlap banner on the old window and the burlap and lace banner on the fireplace screen. I also made the hydrangea wreath, printed and framed the subway art a few years ago and wrapped jute around a chrome utensil jar. 


The old books are Jonathan's grandfather's and the pumpkin candle holder I got for $1 at a thrift store last year. 


With any luck, I'll be repainting the rest of the family room during the next couple of weeks!! Stay tuned.

Sunday, September 13, 2015

Fireplace Update

We've been in our new home a little over 4 months. In that span of time we've remodeled the kitchen, built in the basement, painted both of the kids rooms, created a workshop in the unfinished portion of the basement, and we've been decorating filling the space little by little. There's not a room in this house that doesn't need painting, so I've been hesitant to fill my walls the way that I want them since I'll just have to pull everything again before I paint. 

The next room on my list is the family room. This room is very dark because we have a lot of large oak trees in our front yard along with a big front porch, so there isn't a lot of natural light that comes in. I plan on going with a light gray, but before I tackle the walls, the trim HAS to be repainted. We are fortunate enough to have a big fireplace but it's ugly. It's brownish-orange and it just sucks what little light we have right out of the room. The house was built in the early 90's, so it's outdated and needed a serious (but cheap) update. If I had an endless budget I would rip it out and redo it completely, but my budget was $0 so that wasn't an option. Instead I tracked down my trusty quart of white latex paint and went to town. 

I taped everything off and then I just used an angled paintbrush to apply. I used two coats and laid it on pretty thick on the mortar because it was really porous and I was trying to fill the holes and cracks.

Here is the living room on the day that we moved in.


And here is a close up of the finished project. I still need to style the hearth and add our screen, but I LOVE how it turned out. It's so clean and crisp and instantly brightened the room, even with the brown walls.


Once we paint the trim, patio door and walls I'll do a full living room tour. I'm loving how it's turning out. It's a rectangular room, so we've managed to have a nice sized living space and I have a big desk in front of our double windows. That way I can spend time with the family while I'm getting some work done. Stay tuned! 

Friday, July 10, 2015

Yes, I'm a Roadside Picker...

In my last post where I showed you guys our kids' art space in our new basement, I mentioned that I picked up the cabinet on the side of the road. I admit it, I'm a roadside picker. If I see something clean and awesome on the side of the road, it's probably going to come home with me. In this case, renters in our old neighborhood had moved and left a ton of stuff behind. The owners of the property threw it all to the curb and I mosied on down and drug it back up to my house! I definitely have rules when I'm roadside picking:


  1. It can't be in a pile of actual trash-it has to be clean enough to put in the car with my kids
  2. No fabric of any kind. Hard surfaces ONLY.
  3. It has to be something that I'm going to use right away. We don't have the space to store roadside junk that may or may not ever get used.
With that being said, I knew immediately what I would use that cabinet for. Which was to store art supplies for the babies. 

This is what it looked like before I painted it. (I had already taken the drawers out and sprayed them before I remembered to take photos)


The main issue with it is that it was dirty. I cleaned it up and then I used a green brillo-type sponge to rough it up and prep it for painting. I don't like to sand and I use every means possible to avoid it. Luckily, with spray paint, there's really not much need for sanding. 


The top was the worst part and yes, you can see the texture through the new paint. BUT since it was just a cabinet for the kids and I knew I'd end up putting something on top of it, I moved ahead. Another option if you were too concerned would be to Modpodge fabric on top, or even spray glue decorative paper. 


This is the spray paint I used. Rust-oleum's 2x Ultra Cover in Ocean Mist.


I applied two light coats to the entire cabinet and then I went through and touched everything up before letting it dry for several hours.


After it was dry, I put it all back together and moved it on downstairs. Down the road, I may paint the sides of the drawers a fun color and maybe put some drawer liners in, but for now, it's serving it's purpose just fine. 


Please don't tell me I'm the only one who picks up perfectly good furniture off of the side of the road?! I saved it from going to a landfill, so I basically saved the planet, saved money in my pocket AND provided a beautiful and functional piece of furniture for my children. Win, win, win! 

You can click here to see the full art space tour with before and after photos.

The Kids Art Space REVEAL!

I've already mentioned that the kitchen was #1 on our list to renovate when we bought our house, but the runner up was the basement. The previous owner had partially completed some of the drywall, but there was still a TON to finish. He had even taped dirty carpet to the floor! His decorating style definitely did NOT match mine! 

It was essential that we finish the basement quickly because we wanted to create a fun family space in the basement that we can all enjoy. Our new house is slightly smaller than our old house, so we needed the extra square feet. So far the room is finished, painted and floored. I'm slowly decorating it and dividing it into three zones: an art zone for the kids, a family room space with a TV and the kids toys, and a space for Jonathan's guitars, amps, etc. The family space is in progress, but the art zone is COMPLETE! This is what the basement looked like when we moved in:


And this is what this sad, dark, partially finished corner looks like now!


There are no windows in the basement, so it's necessary to decorate with light colors. The walls turned out darker than I wanted them to be, but the room is huge and I didn't realize it until I was finished, so I wasn't about to repaint. I'm sure I will later. The ceiling is also painted a pretty light blue, which is the same blue as in our kitchen. Jonathan installed the floors himself and we are in LOVE. We bought them from Lowes and they were insanely easy to install. Even though they're not real wood, it's next to impossible to tell.

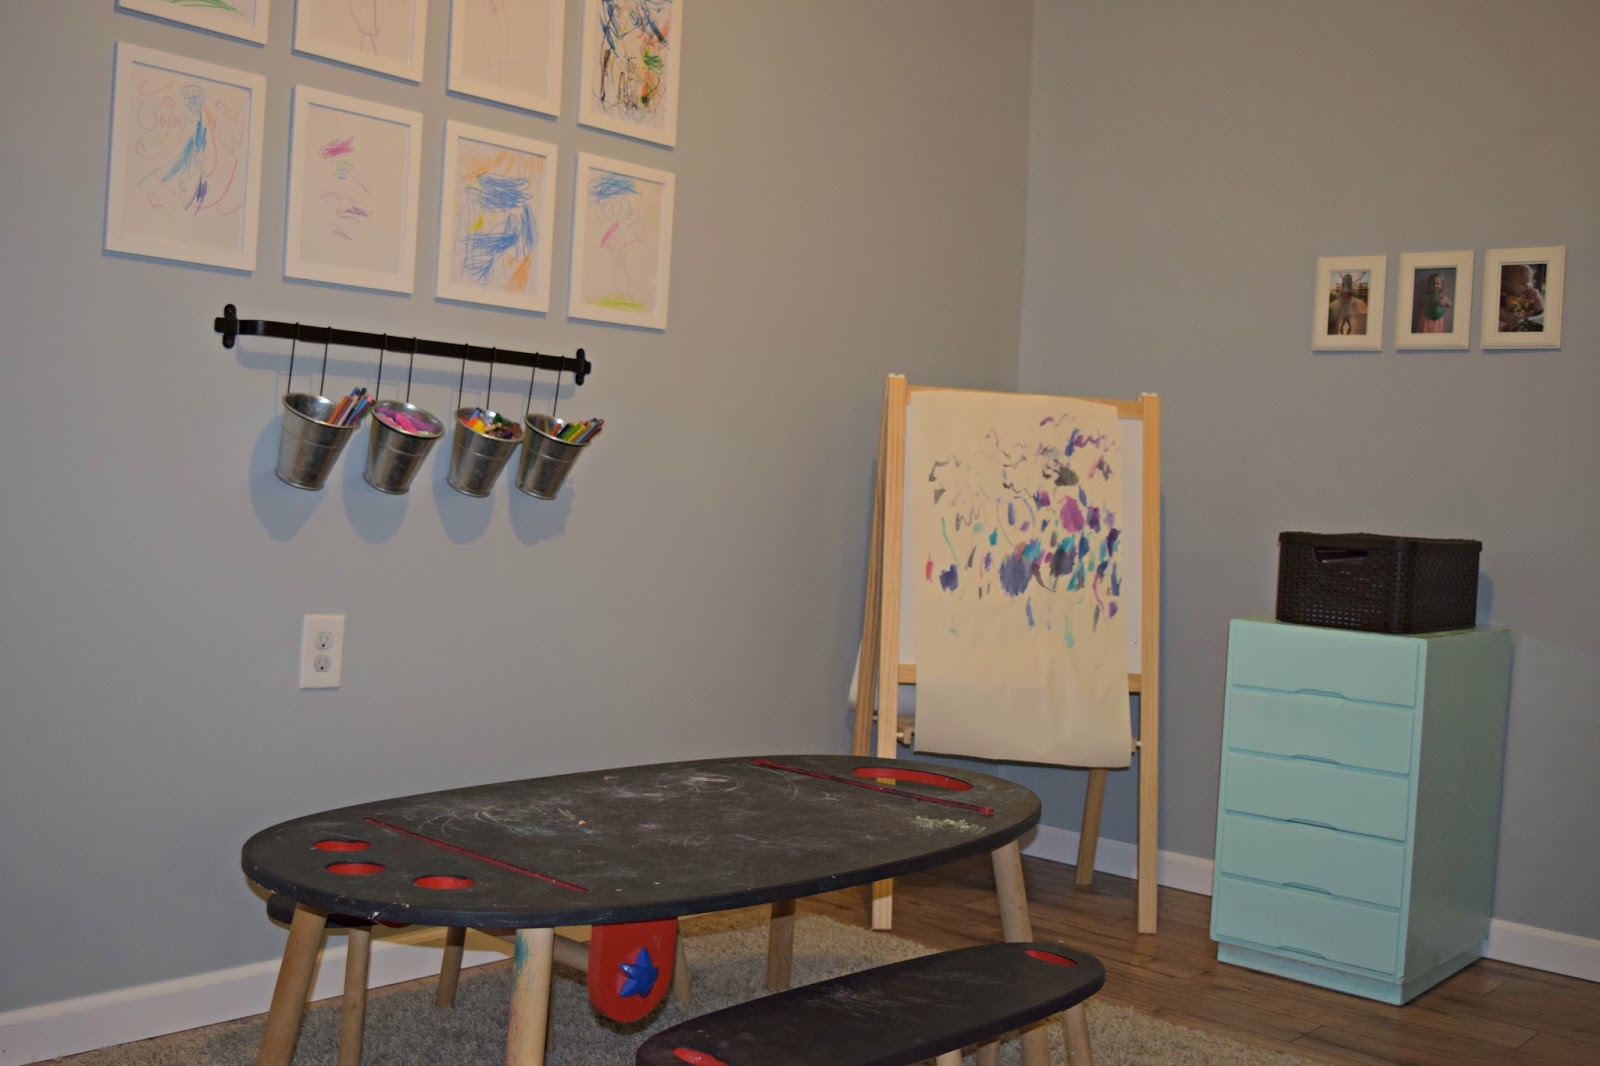
For the kids' space, I used items that we already had. I bought NOTHING new. It is a HUGE boost of confidence for kids to see their art and their photos displayed. Their framed art work is from their old playroom. As they create new masterpieces, we'll swap them out with the old. The kids LOVE seeing their art decorate the room. 


I also displayed some photos of the kids next to the bright art on the other wall. There's a photo from each of their birthdays this year and a silly Madsy and Anna superhero photo. The cabinet was a find off the side of the road! It was sturdy and the drawers looked great, so after spray painting it (and a good scrub down!) it was the perfect addition to this corner. The drawers are wide and deep, so they easily house all of the coloring books, construction paper, paint, Playdoh, etc. 


We bought the easel and hanging storage from Ikea. Their coloring pencils, crayons and chalk are stored in the buckets.


(Disregard the change of art over the storage cabinet. I changed my mind after hanging these photos, they just weren't taking up enough of the wall)

We bought this Alex art table from Learning Express 4 years ago. It had obnoxious bright circles painted all over the tops of the table and stools, so earlier this year I repainted the surfaces with chalkboard paint. They love drawing on the table and it's even something Noah can do without worrying about the mess. 

I can't wait to finish the rest of the basement and show y'all very soon! For fun, here's a before and after! 


Have a great weekend!!!


Thursday, July 9, 2015

Our Farmhouse Inspired Kitchen

When we moved into our house, the kitchen looked like this: 

The walls were maroon on top, white below the chair rail. White laminate counters, white cabinets, black appliances (no refrigerator) and a chocolate brown island. The sink was a shallow double stainless steel sink with a wobbly faucet. And it was missing a drawer and two cabinet doors. We knew from the beginning that we would be immediately upgrading this room. 

With a few minor exceptions, here is what the kitchen looks like post reno:


The first thing I did was choose my color scheme. Our house is dark. There are windows, but because of all of the oak trees we have outside, there isn't a lot of natural light coming in. I chose a pretty light blue for the walls, above and below the chair rail. 

This is the view of the main wall extending from the eating area on the other side of the kitchen. 


I created two different zones in the kitchen with the art on the walls. The plates are hanging over the buffet, anchoring the eating area. The art grouping on the other side of the kitchen is anchoring that portion of the kitchen. 


This wall is huge and we didn't have a lot of money in the budget for artwork. I purchased this book from Amazon for around $15. The pages are perforated so you can pull them out and hang them. I hung them in Ribba frames from Ikea that we already had. 


You cannot have a farmhouse inspired kitchen without a farmhouse sink. Warning: If you buy a farmhouse sink for existing kitchen cabinets, you will have to modify your cabinets. We had to cut into the top portion of the cabinets and create a "shelf" for the sink to sit on. The sink is very heavy, so it has to be braced properly. We learned how to do it with Youtube videos and we had a carpenter friend help. 


I'm a huge fan of tuxedo cabinets and am very happy with how ours turned out. The gray on the bottom has a lot of blue in it and the white on the top brings the light in that we desperately need.


I wanted my island to stand out. We originally wanted to do butcher block counters on the island, but it was so much easier to go with the granite, plus we loved how pretty it was. I chose to do fun knobs on the island instead. 

Keurigs definitely don't look "farmhouse", but throw it on a tray with a distressed mason jar for kcups and it definitely helps. :) 


Most farmhouse kitchens have stainless steel appliances, but we chose slate. You don't see slate very often, so we liked the uniqueness of it. Also, it's smudge proof and still boasts stainless steel in the handles. We also got a stainless steel hood. The original kitchen had an over the range microwave, but it was far too low, so we replaced it with a hood and bought a countertop microwave. 


I added some touches from our families in our kitchen as well. These recipes are from Jonathan's late grandmother and the tea pitcher holding my wooden utensils is my late grandmother's. 


In my opinion, a room in your house is never finished. There is always room for improvement and changing a space keeps it fresh. In the long run, we do plan to change the floors, add a subway tile backsplash and there will of course be more homey touches added. I also want to recover the barstools with a fun fabric. 

I haven't added any pictures of our kitchen table because I still haven't styled the top of it or assembled the bench that we bought for extra seating. I'll add those photos as more work gets completed. Click here to see how I styled our buffet to reflect the farmhouse style.

Thank you for reading! Let me know in the comments what you think! Have you recently upgraded your kitchen? It's sooo stressful, but totally worth it!


Tuesday, July 7, 2015

Paint it, don't toss it!


We received this beautiful mirror as a Christmas present from my parents. At the time, it was the perfect addition to our dining room. But as always, tastes change. I would normally donate or sell something if it doesn't match my new taste, but I loved the character in this mirror. If there is something in your home that you aren't in love with, don't hesitate to change it. A simple coat of paint can make a world of difference. 

Here is our mirror in our old dining room.


It was a brown/bronze color. And here it is now!


(You'd think we love brown walls by seeing two rooms from two different houses in the same color, but truth be told, I hate the walls. We painted our dining room a beautiful dark gray after this photo was taken. We're currently using this mirror in our master bedroom and we have plans to paint this room as well. The previous owners painted it this color and it is far too dark for my taste.) 

To update the mirror, I used a sample jar of Behr's Premium Plus Ultra in a matte finish. The color is Island Oasis. I've already used it for other projects and had more than enough for the mirror. These sample jars go a long way when you're doing small projects around the house, so they're definitely worth the $3-$5. 

I didn't take a photo of the paint brush that I used, but it was an old short bristled brush that was dirty and stiff. I wanted the mirror to have an aged look, so the harder the bristles, the better. I drug a little bit of paint onto the mirror at a time, let it dry and then put a second coat. If you over apply the paint, you can lightly sand it in the spots that you want it to appear worn. There is no science to this. You don't have to prep the surface at all. This wasn't real wood, it was more of a heavy veneer, so it was really slick. It didn't matter, the matte finish adhered right onto the surface. 

Here is a detailed shot. You can see more of the aged finish in this shot, although the color is definitely more blue in person. 


Here's the finished product one more time.


I have a lot of things that I want to do in this room. Paint is #1. I also want to gradually change our furniture or paint it. I want a breezy, romantic and rustic feel in here. I want our furnishings to reflect mine and Jonathan's relationship. So I am adding photos of just us, wedding keepsakes, dating keepsakes, etc. I want this to be our oasis, so I have a LOT of work to do! The mirror definitely helps, though!

Now, go find something to paint in your house and tell me all about it!


Tuesday, June 30, 2015

DIY Milk Bottle Decor

With the explosion of farmhouse style (thank you Joanna Gaines!) people have been using a lot of vintage items for decor. I jumped right on the band wagon when we decided to redo our kitchen and aim for a farmhouse feel. The style is so traditional and I really feel like it's going to be around for a while, so we felt comfortable going with the current trend. Plus, I LOVE my farmhouse sink, so I don't care if it's out of style next week, I will forever love it. FOREVER. 

Moving on...

I haven't revealed our kitchen makeover just yet, but I will be in the very near future. For now, please settle for a quick DIY milk bottle project. You can buy milk bottles for anywhere from $5-$20+. It's not that we can't afford a $5 milk bottle, but we already had so many frappuccino bottles on hand and they look just like milk bottles!


This is so simple that it's barely a DIY post. It's more of a "Hey, have you realized this yet?" post. The possibilities with dressing these up are endless. You could paint, distress, use chalkboard labels, fabric, etc. After peeling off the label, I chose to tie lace tulle to the middle of the bottle and wrap jute around the neck. I really think I may paint and distress some soon for another part of the kitchen. I put them on a tray we bought from Ikea and put a dried hydrangea in one of them and BOOM, it's immediate farmhouse decor for FREE. 


Thanks for reading! Now go get that coffee you so desperately need and add a little farmhouse charm to your home! (To see all of the details on the buffet, check out this post!

**UPDATE: Click here to see our Farmhouse Inspired Kitchen reveal**

Our DIY Farmhouse Styled Buffet

I haven't revealed our farmhouse inspired kitchen, but it's coming very soon! Right now, I'd like to show you how I styled the buffet in our eat in kitchen. The kitchen is very large, divided by an island in the middle. In a bay window we have our dining set from our old dining room and the buffet. The wall behind the buffet is HUGE, so it was really difficult to style. I wanted the room to feel cohesive AND like it was two separate spaces. It was a challenge. I kept the farmhouse style with the items on the buffet, wall decor and the furniture we already had was very farmhouse-y. 

Here is how I styled our buffet for a cohesive farmhouse feel with items we had from around the house. 


I am the queen of DIY. I will scrounge up items from around my house and make decor way before I'll go buy something new. I painted both of the thrifted frames that are in the back. The on the left is framed scrapbook paper and the one on the right is a botanical print from a book that I bought super cheap from Amazon. (There will be details about that in the kitchen reveal) The milk bottles that you see are DIY projects as well. You can see what I made them from here. The Ikea tray that they're sitting on is the only new item on this buffet. But it's so pretty and it resembles eyelet lace, so I couldn't resist buying it.


The plates hanging on the wall were thrifted. They were $0.25 each. The one in the middle is extra special because that is a plate from the same exact dish set that my great grandmother used to own! It's not her actual plate, but it's identical. And it makes me feel so warm and happy when I see it. I can remember her serving delicious meals on those plates and how much fun it was to handwash them while I got to stand on the stool at her house. I can't believe I just happened to come across one at the thrift store. 


The tea pot, sugar bowl and Japanese statue are from my dad's mom. She passed away and I inherited a lot of treasures from her.  The books that the tea pot is sitting on are mechanic books from my husband's grandfather. They're very old and very beautiful. It's very important to me to decorate with meaningful items. Seeing a plate like my great-grandmother's, dishes from my grandmother and books from Jonathan's grandfather are daily reminders of those that we love and miss so deeply.


You can see the full buffet here, which surprisingly we bought from Ikea. It's discontinued now. You can tell how long the wall is that spans through the eat in portion all the way to the rest of the kitchen. And beside the buffet is a chair that used to sit beside my grandmother's bed. I recovered the cushion with some extra fabric I had lying around and I left all of the marks on the chair because wood needs marks-it needs scratches, bumps and creases for character.

Thank you so much for reading! For more posts, please subscribe to emails from Our Journey in Love! Comment below with any questions and let me know if you've fallen on the farmhouse bandwagon!!


Sunday, June 28, 2015

Noah's *NEW* Room Reveal!

Noah’s Room Reveal

It’s been two months since we closed on our house. We've worked in every single room and honestly, there’s not a single room that is complete. But if I had to choose one, I’d choose Noah’s room. His room is the easiest. It’s a nice size, not too big and not too small. We live in a cape cod, so the upstairs ceilings are sloping, making some of the walls shorter than standard walls, which made it very easy to paint.

Here is the room as it looked when we first purchased the house. It was fine. Just not our style.


And here is the room as it looks now. **This room has very little natural light, so please excuse the darkness in the photos**


I bought a gallon of gray paint for the lower cabinets and island in our kitchen (which is SO close to being finished, I can't WAIT to post about it!) and I had a TON of paint left over. So I used it in his room. If you're wondering, the 2 doors that you see from the entrance into his room are the closet and the hall going into the finished bonus room. The girls share the bonus room for their bedroom because we thought it'd be cool for all three of them to have this wing of the house for themselves. They LOVE it.

At our last house, we were still transitioning Noah from our bed to his bed, but he was still sleeping our room. He NEVER slept in his room that I slaved over when I was pregnant with him!  When we moved into this house, we started him out in his room immediately. It took a couple of days of adjustment, but now he sleeps through the entire night right here in his crib. Because we co-slept for over a year, I put a body pillow along half of the crib so he has something soft to roll into and he loves sleeping on pillows, so he has his own bed pillow. I bought this crib second hand for $70. I also use the Ikea Poang chair in the corner on the off chance that he wakes up in the middle of the night. Below it, we keep his baby monitor and a sound machine, he sleeps very well with the rain option playing throughout the night. 


I bought this dresser second hand as well and I repainted it this fun green and spray painted the knobs with Rustoleum’s oil rubbed bronze. I absolutely LOVE their metal spray paints. They have a very authentic metal look, so I highly recommend them for all sorts of projects. I try to buy as many wooden toys as I can for him, they last longer and look cooler to me. The lanterns are from Ikea and I thought they were string lights, so when I opened the box to find only lanterns, I had to get creative. I strung them on jute and simply tacked them to the wall. He loves them and points at them saying, “ball!” The trash can is a basket that I bought for $1 at a thrift store. I painted some areas green and left the rest natural. It blends nicely with the room and looks much better than a plastic can.


I had these “Noah” letters and frames in his other room, the same color. I printed pictures of him and hung them with washi tape so we can update them as he gets bigger. I made this train table from an Ikea Lack coffee table and fabric remnants that I found at Walmart. The train track is from Ikea also, your guess is as good as mine on where the rest of his trains are! My parents bought him this tent. He gets in it all of the time and plays peek-a-boo. The girls get in with him often and all of them enjoy it.


This nook is my favorite part. The previous owners built in desks in the bedrooms that have dormers. Originally, I didn’t think I’d keep the one in here because he’s too small for a desk, but we’re planning on staying here for the long run, so I knew I should probably keep it for homework when he gets bigger. Right now I put his bean bag inside and it's more of a toy and reading nook. I made the curtains from a duvet that I found at Ikea for $15. If you remember, the matching pillow case is on Noah’s pillow in his crib. I simply cut the duvet in half, hemmed the edges and created a rod pocket at the top. I used a tension rod to hang it and used jute to pull back the sides.


The rug is also from Ikea. Jonathan has instilled a healthy love for Hot Wheels in all of the kids, so the three of them get down and play on this rug all of the time. I use bins for Noah’s toys. It makes clean up so quick and easy and even he can clean up without much help from me.


While I would love a house full of “Pinterest perfect” rooms, they just aren't practical. And they're holding a standard over your head that is just not attainable unless no one else lives in your house. Kids need toys and unfortunately some of them are big and not so attractive (ahem, race track and tent), but they make my baby smile and he is using his imagination like crazy when he plays in his room. 

Still on my to-do list for this room:
  •     Paint the dormer nook the same green as the dresser (if you notice, it’s still the original green that it was when we bought the house, I’ve intended to paint it an accent color from the beginning)
  •     More wall décor
  •     Transform crib to toddler bed soon
  •     Find ways to bring more light-more white accents and more lighting in the back corner

I hope you enjoyed Noah’s room reveal! If you're wondering, he’s 17 months old and this room suits his needs perfectly! Stay tuned for our kitchen reveal, basement reveal and Madelynn and Annabella’s room reveal! 

Are y'all redecorating any rooms right now? Have you recently moved into a new house? Comment below and tell me all about it!