Showing posts with label Organization. Show all posts

Friday, July 10, 2015

Yes, I'm a Roadside Picker...

In my last post where I showed you guys our kids' art space in our new basement, I mentioned that I picked up the cabinet on the side of the road. I admit it, I'm a roadside picker. If I see something clean and awesome on the side of the road, it's probably going to come home with me. In this case, renters in our old neighborhood had moved and left a ton of stuff behind. The owners of the property threw it all to the curb and I mosied on down and drug it back up to my house! I definitely have rules when I'm roadside picking:


  1. It can't be in a pile of actual trash-it has to be clean enough to put in the car with my kids
  2. No fabric of any kind. Hard surfaces ONLY.
  3. It has to be something that I'm going to use right away. We don't have the space to store roadside junk that may or may not ever get used.
With that being said, I knew immediately what I would use that cabinet for. Which was to store art supplies for the babies. 

This is what it looked like before I painted it. (I had already taken the drawers out and sprayed them before I remembered to take photos)


The main issue with it is that it was dirty. I cleaned it up and then I used a green brillo-type sponge to rough it up and prep it for painting. I don't like to sand and I use every means possible to avoid it. Luckily, with spray paint, there's really not much need for sanding. 


The top was the worst part and yes, you can see the texture through the new paint. BUT since it was just a cabinet for the kids and I knew I'd end up putting something on top of it, I moved ahead. Another option if you were too concerned would be to Modpodge fabric on top, or even spray glue decorative paper. 


This is the spray paint I used. Rust-oleum's 2x Ultra Cover in Ocean Mist.


I applied two light coats to the entire cabinet and then I went through and touched everything up before letting it dry for several hours.


After it was dry, I put it all back together and moved it on downstairs. Down the road, I may paint the sides of the drawers a fun color and maybe put some drawer liners in, but for now, it's serving it's purpose just fine. 


Please don't tell me I'm the only one who picks up perfectly good furniture off of the side of the road?! I saved it from going to a landfill, so I basically saved the planet, saved money in my pocket AND provided a beautiful and functional piece of furniture for my children. Win, win, win! 

You can click here to see the full art space tour with before and after photos.

The Kids Art Space REVEAL!

I've already mentioned that the kitchen was #1 on our list to renovate when we bought our house, but the runner up was the basement. The previous owner had partially completed some of the drywall, but there was still a TON to finish. He had even taped dirty carpet to the floor! His decorating style definitely did NOT match mine! 

It was essential that we finish the basement quickly because we wanted to create a fun family space in the basement that we can all enjoy. Our new house is slightly smaller than our old house, so we needed the extra square feet. So far the room is finished, painted and floored. I'm slowly decorating it and dividing it into three zones: an art zone for the kids, a family room space with a TV and the kids toys, and a space for Jonathan's guitars, amps, etc. The family space is in progress, but the art zone is COMPLETE! This is what the basement looked like when we moved in:


And this is what this sad, dark, partially finished corner looks like now!


There are no windows in the basement, so it's necessary to decorate with light colors. The walls turned out darker than I wanted them to be, but the room is huge and I didn't realize it until I was finished, so I wasn't about to repaint. I'm sure I will later. The ceiling is also painted a pretty light blue, which is the same blue as in our kitchen. Jonathan installed the floors himself and we are in LOVE. We bought them from Lowes and they were insanely easy to install. Even though they're not real wood, it's next to impossible to tell.

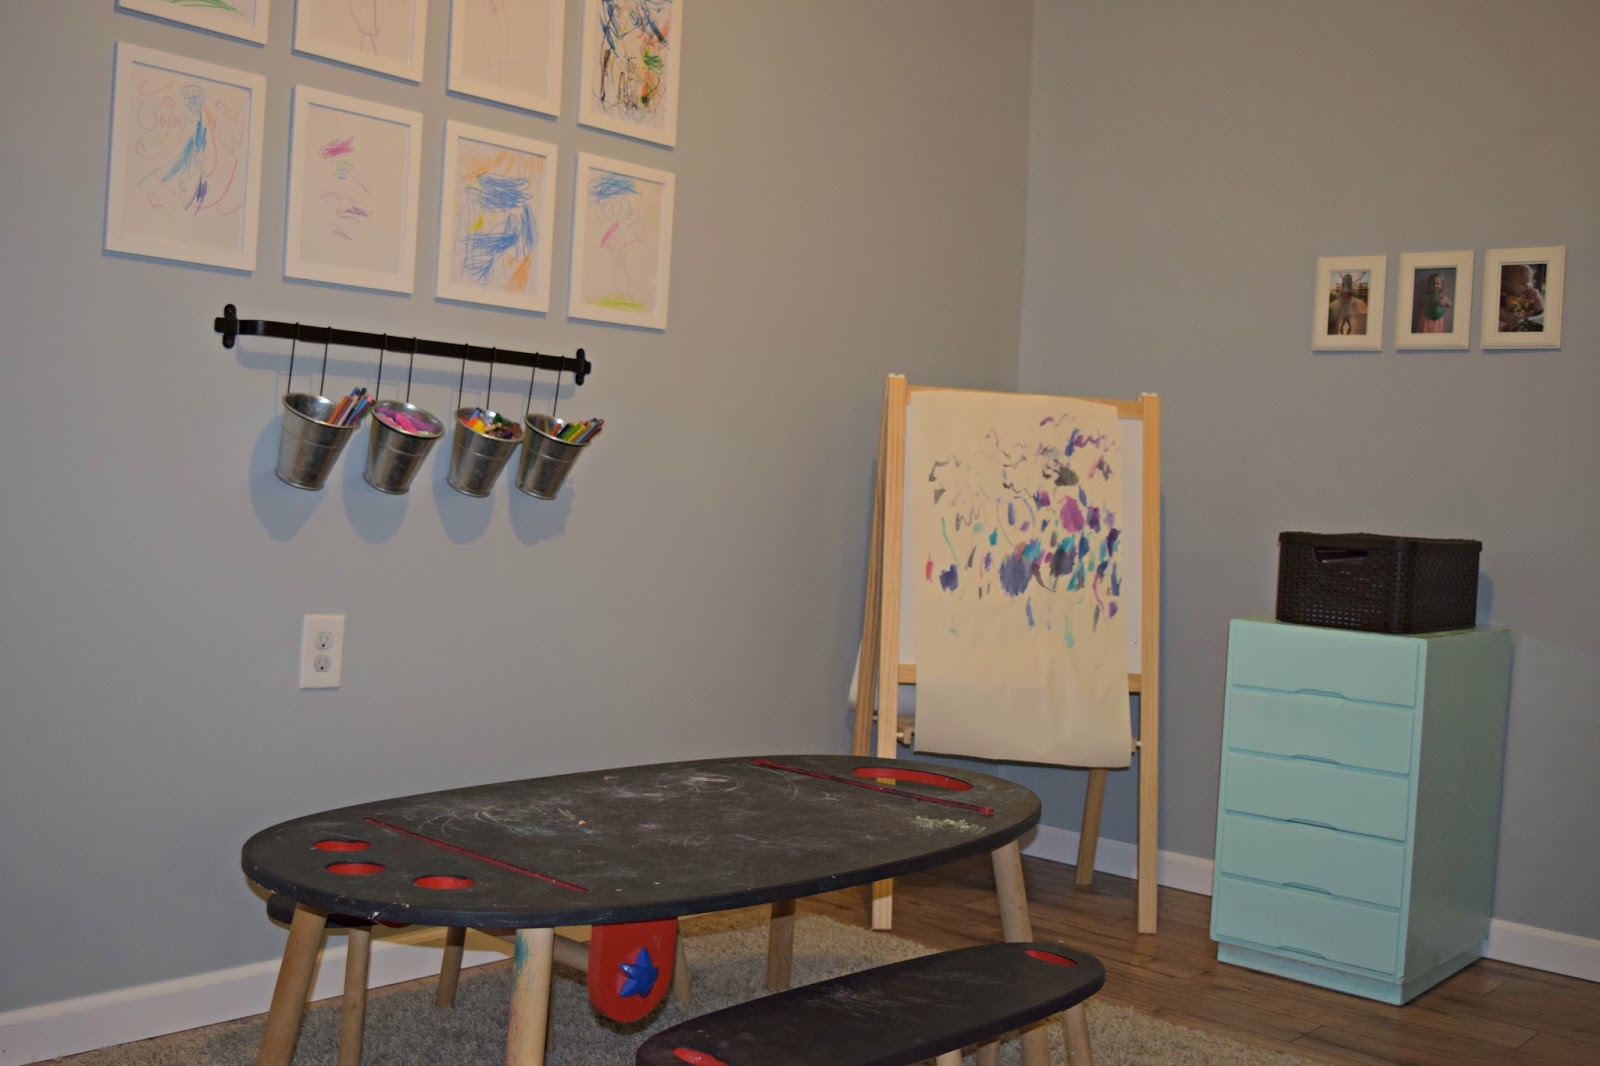
For the kids' space, I used items that we already had. I bought NOTHING new. It is a HUGE boost of confidence for kids to see their art and their photos displayed. Their framed art work is from their old playroom. As they create new masterpieces, we'll swap them out with the old. The kids LOVE seeing their art decorate the room. 


I also displayed some photos of the kids next to the bright art on the other wall. There's a photo from each of their birthdays this year and a silly Madsy and Anna superhero photo. The cabinet was a find off the side of the road! It was sturdy and the drawers looked great, so after spray painting it (and a good scrub down!) it was the perfect addition to this corner. The drawers are wide and deep, so they easily house all of the coloring books, construction paper, paint, Playdoh, etc. 


We bought the easel and hanging storage from Ikea. Their coloring pencils, crayons and chalk are stored in the buckets.


(Disregard the change of art over the storage cabinet. I changed my mind after hanging these photos, they just weren't taking up enough of the wall)

We bought this Alex art table from Learning Express 4 years ago. It had obnoxious bright circles painted all over the tops of the table and stools, so earlier this year I repainted the surfaces with chalkboard paint. They love drawing on the table and it's even something Noah can do without worrying about the mess. 

I can't wait to finish the rest of the basement and show y'all very soon! For fun, here's a before and after! 


Have a great weekend!!!


Thursday, February 26, 2015

Make the most of your tiny workspace!

I mentioned in my family room tour that I have a small workspace in the back of the room. I don't want to miss out on family time, but sometimes the only time I can catch up on work is on the weekends or when Jonathan gets off work. This little workspace in the back of the family room is perfect. When I need more room, I relocate into the dining room, which is where we do a lot of our crafting and projects already. One day I'll have a studio, but until then, this fits my needs perfectly.


<!-- Please call pinit.js only once per page -->
<script type="text/javascript" async defer  data-pin-shape="round" data-pin-height="32" data-pin-hover="true" src="//assets.pinterest.com/js/pinit.js"></script>
I got the desk from my parents basement and painted it yellow for when it went in our kitchen. I'll be repainting it soon. The chalkboard is a mirror that I got from the thrift store and repainted. I use mason jars with chalkboard labels for desktop storage and all of the drawers are organized with various supplies. I also got the bamboo tray/basket from the thrift store and I use it to hold current fabric that I'm working with.


I definitely prefer chalkboard markers over chalk. It look so much nicer too.


I keep my planner, journal, and binder on the desk. I can use the sewing machine on the desk for small projects, but move it into the dining room for larger ones.


This is the perfect verse, isn't it?


I store my yarn, fabric and laptop in this armoire along with other supplies. It's right behind my desk and it saves so much space on and in the tiny desk.


Here is my little nook tucked in the back. You don't have to have a huge space for working. With some creativity, you can make the most of any little space in your home.

Thursday, April 25, 2013

A Playroom Fit for a Princess

Hello!  If any of you have children, you know how important it is to have one space dedicated to their toys.  During my pre-kids days, I always wondered how on earth kids accumulated so.much.stuff!  Two girls later and I'm still wondering the same thing.  Those cute little purchases add up to a house full of toys right before your eyes.  That's when I took the risk and moved both of the girls into the same bedroom and turned Madelynn's room into the playroom.  I am so glad that I did.  They love sleeping in the same room, plus since there are no toys in their bedroom, I don't have to worry about Madelynn getting up and playing when she's supposed to be sleeping.  And even though we still have a few toys in the family room, the majority of them are in the playroom. Although Madelynn's room has undergone three make overs to date, here is the original nursery photo.


And here is the current playroom:


This is the view from the pink wall:


I kept the original yellow on all of the walls, but one.  The pink is the same color as the opposite wall's circles.  I kept the white cabinet, which we purchased from Ikea, but dressed it up with heart print fabric from Ikea.  You can see that tutorial here.  The cabinet provides tons of storage inside and out.  


On the other side, I added another shelf from Ikea.  


The bins provide the majority of the storage.  The best tip I can give anyone looking to create a playroom for their kids:  put the toys in BINS!  Like most children, my girls empty every single bin on the floor, so clean up is a breeze.  I don't bother with organizing the bins (with the exception of one for puzzles) because it just makes cleaning up more difficult.  At this point, the girls don't care as much about finding one particular toy as much as they care about playing with everything they own.  The art above the shelf is DIY.  I cut round circles out of the heart fabric and placed it in embroidery hoops and the framed art is actually cut from gift bags.  


For Annabella's first birthday, she received some adorable gift bags, so I measured and cut squares to fit the frames.  


I also took advantage of the inside of the closet. 


I turned an old bookshelf into a dress up shelf by taking the inside shelves out and putting up a tension rod to hang the clothes.  Again, the heart fabric was put to use.  Hats stack on top of the shelf and there are also hooks on the outside of the dress up shelf for necklaces and head bands.  I got the idea off of Pinterest some time ago.  

In the corner is a snuggly reading nook.


Madelynn and Annabella love sneaking in and closing the doors behind them.  Both of them are huge bookworms, so this is a perfect place for them to "read" to each other.  And by utilizing the inside of the closet, there is more room for them to play in the room.  I do plan on painting the inside of the closet and putting some baby safe lighting inside.  

Above the closet door, I hung a Princess banner that I made for my best friend's baby shower.  It's made from scrap book paper, as well as the elephant art to the right of the doors.


I am so glad that I created this space for them.  It's completely personalized for their needs.  Madelynn loves hanging her art on the walls and I love that they have a space just for them where they're safe and can have a blast.  And not having toys strewn all over my house is a definite plus!  Have you created a space just for your kids in your home?  Or have you gone the other route and figured out how to integrate their toys into your common spaces?  Thanks for reading!

Leslie