Thursday, April 25, 2013

A Playroom Fit for a Princess

Hello!  If any of you have children, you know how important it is to have one space dedicated to their toys.  During my pre-kids days, I always wondered how on earth kids accumulated so.much.stuff!  Two girls later and I'm still wondering the same thing.  Those cute little purchases add up to a house full of toys right before your eyes.  That's when I took the risk and moved both of the girls into the same bedroom and turned Madelynn's room into the playroom.  I am so glad that I did.  They love sleeping in the same room, plus since there are no toys in their bedroom, I don't have to worry about Madelynn getting up and playing when she's supposed to be sleeping.  And even though we still have a few toys in the family room, the majority of them are in the playroom. Although Madelynn's room has undergone three make overs to date, here is the original nursery photo.


And here is the current playroom:


This is the view from the pink wall:


I kept the original yellow on all of the walls, but one.  The pink is the same color as the opposite wall's circles.  I kept the white cabinet, which we purchased from Ikea, but dressed it up with heart print fabric from Ikea.  You can see that tutorial here.  The cabinet provides tons of storage inside and out.  


On the other side, I added another shelf from Ikea.  


The bins provide the majority of the storage.  The best tip I can give anyone looking to create a playroom for their kids:  put the toys in BINS!  Like most children, my girls empty every single bin on the floor, so clean up is a breeze.  I don't bother with organizing the bins (with the exception of one for puzzles) because it just makes cleaning up more difficult.  At this point, the girls don't care as much about finding one particular toy as much as they care about playing with everything they own.  The art above the shelf is DIY.  I cut round circles out of the heart fabric and placed it in embroidery hoops and the framed art is actually cut from gift bags.  


For Annabella's first birthday, she received some adorable gift bags, so I measured and cut squares to fit the frames.  


I also took advantage of the inside of the closet. 


I turned an old bookshelf into a dress up shelf by taking the inside shelves out and putting up a tension rod to hang the clothes.  Again, the heart fabric was put to use.  Hats stack on top of the shelf and there are also hooks on the outside of the dress up shelf for necklaces and head bands.  I got the idea off of Pinterest some time ago.  

In the corner is a snuggly reading nook.


Madelynn and Annabella love sneaking in and closing the doors behind them.  Both of them are huge bookworms, so this is a perfect place for them to "read" to each other.  And by utilizing the inside of the closet, there is more room for them to play in the room.  I do plan on painting the inside of the closet and putting some baby safe lighting inside.  

Above the closet door, I hung a Princess banner that I made for my best friend's baby shower.  It's made from scrap book paper, as well as the elephant art to the right of the doors.


I am so glad that I created this space for them.  It's completely personalized for their needs.  Madelynn loves hanging her art on the walls and I love that they have a space just for them where they're safe and can have a blast.  And not having toys strewn all over my house is a definite plus!  Have you created a space just for your kids in your home?  Or have you gone the other route and figured out how to integrate their toys into your common spaces?  Thanks for reading!

Leslie
The Georgia Baby Flour Trap

We love watching Duck Dynasty.  I always try to catch the new episode on Wednesday nights and most Friday nights I watch the reruns.  (What an exciting Friday night, right?)  The clip below is from the episode where Martin loses his lizard and Phil uses what he calls the Louisiana Flour Trap to catch him.  He sprinkles flour on the floor and starts looking for lizard tracks.  Take a moment and familiarize yourself-it'll all make sense in a minute.


So...skip ahead to a few days after I had seen this episode for the first time.  It was a Monday afternoon during nap time.  Madelynn is hit or miss during nap time.  Some days she lays down and falls to sleep within seconds.  Other days (like this day) she gets up 100 times and drives me insane.  I had already been upstairs at least 5 times to threaten her and put her back to sleep, so by this point I was fed up when I heard her little feet running down the hall.  I creeped up the stairs expecting to find her playing in her playroom, but she wasn't there.  Nor was she in her bedroom and I didn't see her in my bedroom.  I was starting to get panicked, but right before I called for her I saw this on my bathroom floor:

\
Yes, my daughter had set her own "Louisiana Flour Trap", except this time instead of flour, she had poured baby powder ALL over my bathroom!  And walked through it, exposing herself.  It turned out she was still in the bathroom, just out of sight, and still pouring powder on my floor/tub/rugs/etc.  

And that my friends is how Madelynn invented the Georgia Baby Powder Trap. 


Have a great night!

Leslie


Quick Art!

I made art for Madelynn and Annabella's playroom out of gift bags!


The project was extremely easy, but here is a quick step-by-step of what I did.  

While I was at it, I went ahead and made some for my kitchen as well.  These are the bags that I used.


First, I cut one side of the bag off. 


From there, I used the back of the frame (I got the frames from Ikea) to trace the appropriately sized square for the frame. 


Then cut it out, put it in the frame and voila!  You've got instant (and free) art!!  


In the past I've used scarves as seen in my dining room, fabric, clips from magazines, etc for art.  Be creative!  

Tuesday, April 9, 2013

Annabella's Seustastic 1st Birthday

My baby's first birthday was April 9th.  The first birthday is always bittersweet, isn't it?  It's the very first birthday celebration your child will ever have, so you want it to be one to remember.  However, while you're trying to play happy hostess to your friends and family, you're choking back tears and replaying their birth in your head all day.  We did have a great party though and I'd like to share how I pulled off a Suesstastic First Birthday for Annabella.  I got all of my inspiration from Pinterest and did the whole party on a really small budget.  I searched "Dr. Suess" or "Dr. Suess parties" and got tons of ideas.  Here is what I put together:

In our home, our breakfast area and family room open into each other, so I decorated both rooms and hosted guests in both areas.  This is the family room.


And a close up of the mantle:


I got the tissue paper puffs from Party City.  They were perfect for the theme.  Because I had a small budget, I used items from around the house for decorations.  The Dr. Seuss books were perfect additions to the mantle and I made all of the pennant banners out of scrap book paper.  I got lucky and caught Michael's having a great sale, so what would have been $0.50/sheet was only $0.12 a sheet.  Instead of threading string through the pennants, I just taped each individual pennant to the mantle and then taped crepe paper over the top.  It was a huge time saver and still looked great.  

I made these cute signs out of a piece of poster board.  They were between the family room and kitchen.


And here's the kitchen:


I had to thread these pennant banners together.  You can't get them to swag if you don't.  I bought all of the serving dishes from the Dollar Tree and the plates were $0.99/20 at Party City.  


Here's a side view.  Because we had the party at 2pm, we served party snacks:  fruit kabobs, pretzels, chips and dip, and at the last minute we decided to buy some pizza.

This is Annabella's smash cake.  It's not necessarily Suess themed, but it's bright and funky.  The candles are very Seuss-y.


For the rest of the guests, I baked Truffula Tree cupcakes.  


The cake was chocolate fudge with cream cheese icing.  The trees trunks were pretzel sticks and the truffula part was cotton candy.  There are a number of ways to make truffula tree cupcakes, but this was my inspiration. (I didn't follow this recipe for the cake.) Here's a tip I wish I'd had: do not put them in the refrigerator!  I had to do the tree part twice.  The night before, I made the cupcakes in their entirety, wrapped them in cellophane, and put them in the refrigerator.  By the next day, the cotton candy was hard as a rock and the pretzels were soggy.  So I had to make the trees all over again right before the party.  


I searched for free printables on Google and got these great labels for the treat bags.  Inside I put homemade fudge cookies and ring pops. 


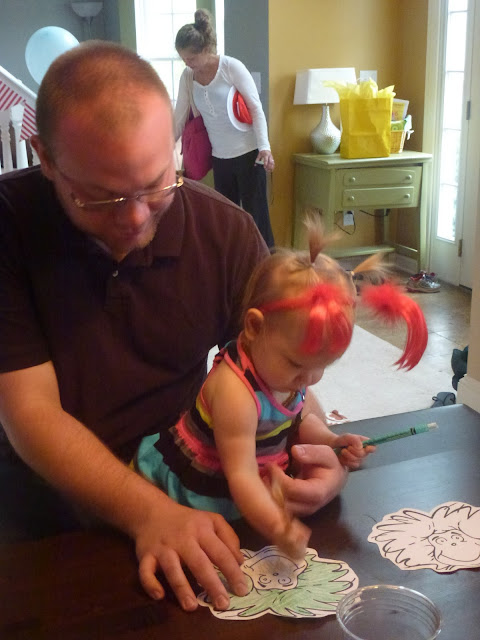
Instead of playing a game with the kids (they varied from 1-5 in age), we did a project.  Thanks to www.obseussed.com, I found these great, free printables for Thing 1 and Thing 2 hand puppets.  Below is a photo of my husband helping Annabella color hers.


And here is Madelynn working on hers.


Here are a few photos of the birthday girl.


It was such a wonderful day!  By making most of the decorations, using the Dollar Tree for dishes, and utilizing Party City's bargain options we were able to do everything ,excluding the food, for under $50.  And even though we didn't buy any Dr. Suess plates or decorations, by using a red and blue color scheme with funky patterns it was clear what the theme was.  

Thank you for reading!!
Leslie